บทความนี้เป็นตัวอย่างการสร้าง LED
(Light effect diode) Control โดยมีความสามารถในการกำหนด สี เปิด-ปิด และมี
Event Onchange เมื่อมีการเปิดปิด กับ LED Control
เริ่มต้นการสร้างโดย เปิดโปรแกรม Borland
Delphi ซึ่งในโค้ดตัวอย่างนี้ผมใช้ Delphi 6 ครับ
1. เมื่อเปิด Delphi ขึ้นมาจะปรากฏ
Project ให้เราไว้แล้ว ให้คุณทำการเพิ่ม Unit ใหม่ โดย เลือกจากเมนู File->New->Unit
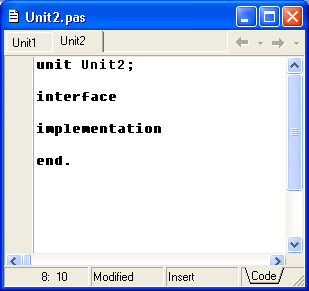
จะปรากฏหน้าต่าง Unit ใหม่ดังรูป

2. ทำการเพิ่มโค้ดดังตารางลงใน Unit2
unit Unit2;

interface
uses Controls,Graphics,Classes,Types;

type
 TLED = class(TGraphicControl)
 private
   FOnColor: TColor;
   FOffColor: TColor;
   FLedOn: Boolean;

   FOnChange: TNotifyEvent;

   procedure SetLedOn(Value: Boolean);
   procedure SetOnColor(Value: TColor);
   procedure SetOffColor(Value: TColor);

   procedure DrawLedEllipse;

 protected
   procedure Paint; override;
   procedure DoChange; virtual;

 public
   constructor Create(AOwner: TComponent); override;

 published
   property OnColor: TColor read FOnColor write SetOnColor;
   property OffColor: TColor read FOffColor write SetOffColor;
   property LedOn: Boolean read FLedOn write SetLedOn;

   property Visible;

   property OnChange: TNotifyEvent read FOnChange write FOnChange;
 end;

implementation

{ TLED }

constructor TLED.Create(AOwner: TComponent);
begin
  inherited Create(AOwner);
  FOnColor := clLime;
  FOffColor := clRed;
  FLedOn := false;

  width := 24;
  height := 24;

end;

procedure TLED.DoChange;
begin
  if Assigned(FOnChange) then FOnChange(self);

end;

procedure TLED.DrawLedEllipse;
var R: TRect;
    off: Integer;
begin
  R := ClientRect;
  if Height>Width then
    off := Width div 5
  else
    off := Height div 5;


  with Canvas do
  begin
    Pen.Color :=Canvas.Brush.Color;
    Ellipse(R.Left,R.Top,R.Right,R.Bottom);

    //3D effect
    Pen.Color := clWhite;
    Brush.Color := clWhite;
    Chord(R.Left+off, R.Top+off,
          R.Right-off, R.Bottom-off,
          R.Right div 2, R.Top+off,
          R.Left+off, R.Bottom div 2);
  end;

end;

procedure TLED.Paint;
begin
  inherited;
  if  FLedOn then
    Canvas.Brush.Color := FOnColor
  else
    Canvas.Brush.Color := FOffColor;

  DrawLedEllipse;

end;

procedure TLED.SetLedOn(Value: Boolean);
begin
  if Value<>FLedOn then
  begin
    FLedOn := Value;
    Refresh;
    DoChange;
  end;
end;

procedure TLED.SetOffColor(Value: TColor);
begin
  if FOffColor<>Value then
  begin
    FOffColor := Value;
    Refresh;
  end;

end;

procedure TLED.SetOnColor(Value: TColor);
begin
  if FOnColor<>Value then
  begin
    FOnColor := Value;
    Refresh;
  end
end;

end.
|
3. ทำการเพิ่ม unit2 เพื่อให้ unit1
สามารถเรียกใช้ LED Control ที่อยู่ภายใน unit2 ด้วยการแก้ไข unit1 ดังรูป
พร้อมทั้งเพิ่มส่วนของการประกาศตัวแปร LED สำหรับการสร้าง Control ดังรูปตามลำดับ


4. ทำการ ดับเบิ้ลคลิกที่ Form1 แล้วป้อนโค้ดดังตาราง
procedure TForm1.FormCreate(Sender: TObject);
begin
  LED :=TLED.Create(Self);
  LED.Parent :=Self;

end;
|
5. คลิกเลือกที่ Form1 ทำการเพิ่มปุ่มลงไป
แล้วทำการดับเบิ้ลคลิกที่ปุ่ม แล้วป้อนโค้ดดังนี้
procedure TForm1.Button1Click(Sender: TObject);
begin
  LED.LedOn := not LED.LedOn;
end;
|
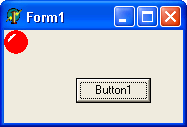
6. ทดสอบโปรแกรม โดยกดปุ่ม F9 แล้วทดลองคลิกปุ่ม
จะปรากฏ LED Control ดังรูป ให้ทดลองคลิกที่ปุ่ม จะเห็นการทำงาน ของ LED
Control ที่เราได้ทำการสร้างขึ้น

ทิ้งทาย
คุณจะเห็นได้ว่า ในการสร้าง LED Control
ในบทความนี้ เราได้ทำการสร้าง Class ใหม่ โดยทำการสืบทอด ความสามารถและคุณลักษณะต่างๆ
ของ TGraphicControl หลังจากนั้นก็ ทำการเขียนโปรแกรมจัดการ ในส่วนของ Control
ที่เราต้องการ
เมื่อเราต้องการเรียกใช้ Class ดังกล่าวที่อยู่ใน
unit2 เราก็เพียงแค่เพิ่ม ชื่อ unit2 ไว้ใน uses ของ unit1 แล้วเราก็ทำการประกาศตัวแปร
LED ซื่งเป็นตัวแปรแบบ TLED
เมื่อมีการ Create ของ Form1 หลังจากที่เราทำการกด
F9 เพื่อ run โปรแกรม ,เราจะทำการสร้าง LED Control ขึ้นมา แล้วแสดงออกมาที่หน้า
Form1 และเมื่อเราทำการคลิกที่ปุ่ม จะมีการเปลี่ยนแปลงของ Control แสดงให้เห็นครับ
จากบทความนี้ คุณอาจนำไปประยุกต์ใช้งาน
สร้าง Control ง่ายๆ สำหรับโปรแกรมของคุณได้แล้วฮะ แล้วพบกันใหม่กับ 9M |